I thought I would share the birthday card I made for Elena's 40th. After lots of thoughts / ideas, I decided to keept it very simple - with just some blue handmade paper and glittered 40.
I made this wallet for the voucher to a clairvoyant visit that Cathie, Kylie and I brought for Elena :)
Tuesday, May 31, 2011
Monday, May 30, 2011
May challenges
I've managed to get 2 LO completed for challenges this month - woo hoo!
White with 1 challenge - white + orange + scallops
Kraft It Up challenge - you need to create a layout WITHOUT patterened paper.
White with 1 challenge - white + orange + scallops
Kraft It Up challenge - you need to create a layout WITHOUT patterened paper.
Sunday, May 29, 2011
Baby shower & 40th birthday bash!
Saturday was a big day for celebrations! I went to Skye's (my BIL's partner) baby shower in the afternoon. Lots of fun games, chatting, yummy food and getting clucky over cute baby clothes :) Unfortunately I didn't take my camera - so no pics to share. I will share pics of the 2 baby shower cards soon.
Saturday night we got dressed up and headed off to Elena's 40th birthday party! Started off with canapes, drinks and photos, then a delicious sit down meal, birthday cake & speeches, then lots of dancing and catching up with everyone! It was a great night :)
Friday, May 27, 2011
Place cards
Elena asked me to make some placecards for the tables for her 40th birthday dinner. I kept the design similar to her invitations.
I made 54 in total!
I made 54 in total!
Wednesday, May 25, 2011
Hexagon progress
I thought I would share pics of how the hexagon blanket is progressing....
I have started stitching the hexagons together and love how it is turning out!! I've just run out of wool, so will have to pick up some more tomorrow. I was going to just make a small rug, but have decided to make a cot size blanket. I've crocheted 67 hexagons so far! Each night while we're watching TV or if I have some spare time I crochet a few. I'm getting them done faster now I have memorised the pattern and don't have to keep checking the instructions LOL
I did have thoughts of getting the blanket finished by this Saturday in time for the baby shower, but that's not going to happen! LOL It will definitely be finished before bub arrives in July though.
Tuesday, May 24, 2011
Scrapbook Expo classes
Only 3 weeks and I'm off to Brisbane for the Scrapbook Expo - I can't wai!! I booked 2 classes this year -
House Coaster Album with Sarah Moore
Shadow Box with Sarah Moore
House Coaster Album with Sarah Moore
Shadow Box with Sarah Moore
Saturday, May 21, 2011
Finger puppets
While I was going through some boxes of old teaching resources I found these felt finger puppets I had made. I had never used them and they were still in perfect condition, so I packaged them up and sent them with Craig to give to an animal / farm crazy little boy who I thought would love them :)
I spoke to Becca & Connor and I'm pleased to say that he does love them :) She sent me this pic - how cute!!!
Friday, May 20, 2011
Blanket & beaded lanyards
I started crocheting this rug last year for my bestie Becca, but it got a bit too hot and I was struggling with the border / edging so I didn't get it finished :( I spent last week finally getting this finished (working on the border and stitching in the threads) so I could give it to Bec :) I still struggled with the border - I started crocheting it and pulling it out to start again at least 7 times! I am really pleased with the finished result. I was working on a deadline (nothing like pressure to motivate you LOL) - I needed to get it finished in time to send off with Craig when he went to Rocky for training this week.
A close up of the border / edge.
Bec and a friend are going on a cruise in a few months, so while I was in my crafty mood I made them a beaded lanyard for their cruise cards :)
A close up of the border / edge.
Bec and a friend are going on a cruise in a few months, so while I was in my crafty mood I made them a beaded lanyard for their cruise cards :)
Thursday, May 19, 2011
Postcards
I am getting quite a collection of lovely postcards from Postcrossing and thought I would share some more :)
Wednesday, May 18, 2011
Hexagons
Colder weather means it's time to bring out the crochet hooks and wool!!! I brought some wool a few weeks ago to make a baby rug for my new niece (due in July). I wanted to do something a little different instead of the usual granny squares I have been crocheting. I have been following the Wednesday Hexalong posts over on Mel's blog and thought I would try crocheting some hexagons :) I found a pattern here and it is very easy to understand and follow. There was one stitch (bobble stitch) that I had not used before, but there is a video clip demonstrating how to do it. There was also an easy tutorial about how to crochet the threads in, so I had a go at changing colours. I'm loving how they are looking so far and can't wait to start stitching them together :) I have made 20 so far...only 40 more to go!
Monday, May 16, 2011
Cupcakes
I went to Simply Crafty on Sunday. It was lovely to catch up with everyone again and as usual I was doing more chatting than scrapping LOL I tried another new recipe- Lamington Cupcakes- from a new cupcake cookbook. I will definitely be making them again :)
We are starting swaps again at Simply Crafty! We decided on a "countryside" (trees, birds, flowers, etc) theme for next month. There are also a few of us participating in a card swap next month - with a kraft theme :)
How cute as these pink cooking molds?!?!?! Mum brought them for me for $1 at the garage sale :)
Exciting news...I am off to the Brisbane Scrapbook Expo in June!! Woo hoo :) I have booked 2 classes this year and I'm really looking forward to it. Cassie and I are heading down Friday night and returning on Monday - should be a very fun road trip :)
Saturday, May 14, 2011
A day at the park
Thursday, May 12, 2011
Professional cruise photos
Wednesday, May 11, 2011
Other storage
A bit more on my storage ...I store most of my scrap supplies (punches, embossing powders / glitters, ribbons, etc) in baskets / plastic containers or metal buckets on my bookshelf. I love using these glass dishes to store my buttons.
I have a bigger basket that I use to store my card making supplies.
This is my latest storage idea - I found this magazine rack to hang on the wall (on sale for $2.50 - bargain!!) at my local dollar store and knew it would be perfect to store my alpha stickers :)
I found these 2 wooden trays in mum's garage sale stash and claimed them. I did think about using them to make shadow boxes, but I'm going to use them to store small embellishments instead :)
Tuesday, May 10, 2011
Stamp storage
I've been changing my storage systems in my scrap room for awhile now - just trying to make it more user friendly. I thought I would share a couple of ideas - just in case anyone was looking for ideas for their scrap room. My biggest change has been storage for my stamps. I had them all my stamps in boxes and didn't really know what I had, so I wasn't using them alot. It was also a hassle to go through them to pack some for scrap days. I brought some Tim Holtz stamp pockets at an expo a few years ago, but didn't have a binder to put them in. After looking around for awhile - I found this DVD binder at my local newsagents which was perfect. I wasn't going to use the DVD sleeves in there, but after a closer look I realised that they would be perfect to fit my clear stamps. I've left the cover on the front - just in case you want to find one too. Now that I've shared - I will replace it with some patterned paper to make it more personalised. The biggest advantage to storing the stamps this was is it's easier to pack for scrap days.
I store my smaller sized stamps in old Creative Memories pocket sleeves. I used to store stickers in there, but gave them away in my last cleanup.
I store my wooden stamps in a basket on one of my cupboards - I think it makes a cute feature :)
The rest of my stamps (that don't fit in my binder) are in a basket and stored with the Stampin' Up stamps on my bookself.
I hope this post has been interesting / inspiring :) Feel free to leave a comment with any great storage ideas you have.
Monday, May 9, 2011
Mother's Day cards
We had a lovely Mother's Day yesterday. We took both Mums down to the beach and had fish & chips for lunch and gave them their presents. Katie & Cohan are down for a week and arrived in time to join us for lunch :)
These are the cards I made using a cute Forever Friends decoupage kit I got as a freebie with a magazine ages ago. This one was for my mum.
This was for Craig's mum.
I gave my mum more cards to add to her stash. I packed them up in a clear cello bag with a simple topper with another one of my funky flowers.
A close up of the bag topper.
Sunday, May 8, 2011
Stamping panel tutorial
This is probably not an original idea and there are likely to be variations of this all over the web, but this is my version of a stamping panel :)
Step 1 - Measure & cut your cardstock to size, then work out where you want to stamp and how big the space needs to be. Mark this on the back on your cardstock with pencil.
Step 2 - Place cardstock in embossing folder, using pencil marks to line it up straight. **Remember you are working at the back of the cardstock, so make sure you have your embossing folder facing backwards** Run through Cuttlebug (or other die-cut machine).
It should look like this.
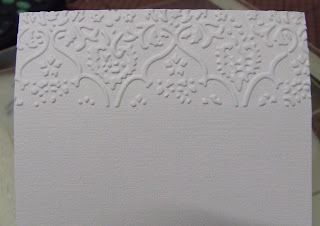
Step 3 - Turn cardstock around, repeat step 2 and emboss other end.
Now your cardstock should look like this.
Step 4 - Turn cardstock face down and score along pencil marks to make lines at the top and bottom of the stamping panel.
Step 5 - Stamp on panel to finish :)
I hope you have found this easy to understand and helpful. Let me know if you try the tutorial :)
Subscribe to:
Posts (Atom)